MyBatis
MyBatis 是一款优秀的持久层框架,它支持定制化 SQL、存储过程以及高级映射。MyBatis 避免了几乎所有的 JDBC 代码和手动设置参数以及获取结果集。MyBatis 可以使用简单的 XML 或注解来配置和映射原生信息,将接口和 Java 的 POJOs(Plain Ordinary Java Object,普通的 Java对象)映射成数据库中的记录。本文简单记录一些关于MyBatis的问题。
参考文章:
Mybatis概述
Mybatis、持久层、框架简介
- MyBatis 是一款优秀的持久层框架,用于简化 JDBC 开发
- MyBatis 本是 Apache 的一个开源项目iBatis, 2010年这个项目由apache software foundation 迁移到了google code,并且改名为MyBatis 。2013年11月迁移到Github
- 官网:mybatis – MyBatis 3 | 简介
持久层:
负责将数据保存到数据库的那一层代码。
以后开发我们会将操作数据库的Java代码作为持久层。而Mybatis就是对jdbc代码进行了封装。
JavaEE三层架构:表现层做页面展示、业务层做逻辑处理、持久层对数据持久化
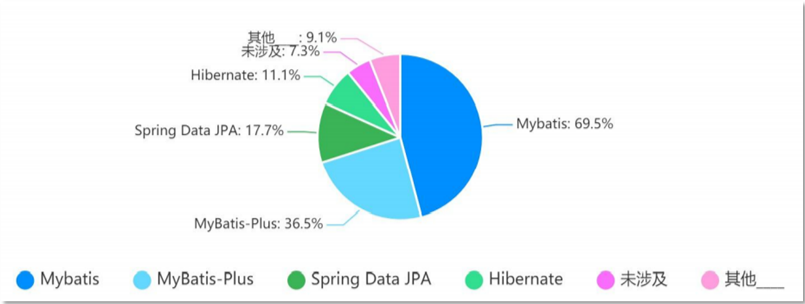
下图是持久层框架的使用占比。
框架:
- 框架就是一个半成品软件,是一套可重用的、通用的、软件基础代码模型
- 在框架的基础之上构建软件编写更加高效、规范、通用、可扩展
Mybatis对比JDBC
核心配置文件mybatis-config.xml
核心配置文件标签必须有向后顺序(相比之下,SQL映射配置文件的同级标签没有先后顺序),如下
- configuration(配置)
- properties(属性)
- settings(设置)
- typeAliases(类型别名)
- typeHandlers(类型处理器)
- objectFactory(对象工厂)
- plugins(插件)
- environments(环境配置)
- environment(环境变量)
- transactionManager(事务管理器)
- dataSource(数据源)
- environment(环境变量)
- databaseldProvider(数据库厂商标识)
- mappers(映射器)
configuration【根标签】
所有子标签均需书写在当前根标签内部
1 |
|
properties【属性标签】
作用:将数据库配置属性从dataSource标签内部提取到外部
属性:resource:设置外部属性文件类路径url:设置外部属性文件真实路径
1 | <!-- 属性标签--> |
settings【设置标签】
作用: 是mybatis中极为重要的调整设置,他们会改变mybatis的运行时行为
mapUnderscoreToCamelCase:开启驼峰命名自动映射,即从经典数据库列名 A_COLUMN 映射到经典 Java 属性名 aColumn。
默认值为false,当设置为true时开启驼峰命名
注意:只能将a_bc与aBc自动映射,不能将a_b与aBc自动映射
1 | <settings> |
typeAliases【类型别名】
alias译为别名
作用 :类型别名可为 Java 类型设置一个缩写名字。 它仅用于 XML 配置,意在降低冗余的全限定类名书写。
自定义别名
1 | <typeAliases> |
也可以指定一个包名进行扫描,MyBatis 会在包名下面搜索需要的 Java Bean,比如:
1 | <!-- typeAliases类型别名--> |
这样sql映射文件resultType属性就可以省略路径package1.pojo:
1 | <!-- 映射配置文件 UserMapper.xml--> |
typeHandlers【类型处理器】
objectFactory【对象工厂】
plugins(插件)
environments【数据库环境设置】
作用:配置数据库连接环境信息。
- 可以配置多个environment。
- 环境可以随意命名,但务必保证默认的环境 ID 要匹配其中一个环境 ID。这样通过default属性切换不同的environment环境。
- 尽管可以配置多个环境,但每个 SqlSessionFactory 实例只能选择一种环境。
属性说明:
environments属性default是每个environment默认使用的环境 ID
environment属性id是指定该 environment 元素定义的环境 ID。
事务管理器transactionManager属性type有两种(type=”[JDBC|MANAGED]”)):
JDBC – 这个配置直接使用了 JDBC 的提交和回滚设施,它依赖从数据源获得的连接来管理事务作用域。
MANAGED – 这个配置几乎没做什么。它从不提交或回滚一个连接,而是让容器来管理事务的整个生命周期(比如 JEE 应用服务器的上下文)。 默认情况下它会关闭连接。然而一些容器并不希望连接被关闭,因此需要将 closeConnection 属性设置为 false 来阻止默认的关闭行为。数据源 dataSource 元素使用标准的 JDBC 数据源接口来配置 JDBC 连接对象的资源。
type有三种(type=”[UNPOOLED|POOLED|JNDI]”):
POOLED– 这种数据源的实现利用“池”的概念将 JDBC 连接对象组织起来,避免了创建新的连接实例时所必需的初始化和认证时间。
UNPOOLED– 这个数据源的实现会每次请求时打开和关闭连接。
JNDI – 这个数据源实现是为了能在如 EJB 或应用服务器这类容器中使用,容器可以集中或在外部配置数据源,然后放置一个 JNDI 上下文的数据源引用。
1 | <!-- default是每个environment默认使用的环境 ID--> |
databaseIdProvider(数据库厂商标识)
mappers 【映射器】
作用:加载映射文件
1 | <mappers> |
Mybatis入门案例(不用mapper)
代码实现
需求:查询user表中所有的数据
创建user表,添加数据
1
2
3
4
5
6
7
8
9
10
11
12
13create database mybatis;
use mybatis;
drop table if exists tb_user;
create table tb_user(
id int primary key auto_increment,
username varchar(20),
password varchar(20),
gender char(1),
addr varchar(30)
);
INSERT INTO tb_user VALUES (1, 'zhangsan', '123', '男', '北京');
INSERT INTO tb_user VALUES (2, '李四', '234', '女', '天津');
INSERT INTO tb_user VALUES (3, '王五', '11', '男', '西安');创建模块,导入坐标
在创建好的模块中的 pom.xml 配置文件中添加依赖的坐标:
1
2
3
4
5
6
7
8
9
10
11
12
13
14
15
16
17
18
19
20
21
22
23
24
25
26
27
28
29
30
31
32<dependencies>
<!--mybatis 依赖-->
<dependency>
<groupId>org.mybatis</groupId>
<artifactId>mybatis</artifactId>
<version>3.5.5</version>
</dependency>
<!--mysql 驱动-->
<dependency>
<groupId>mysql</groupId>
<artifactId>mysql-connector-java</artifactId>
<version>5.1.46</version>
</dependency>
<!-- 添加slf4j日志api -->
<dependency>
<groupId>org.slf4j</groupId>
<artifactId>slf4j-api</artifactId>
<version>1.7.20</version>
</dependency>
<!-- 添加logback-classic依赖 -->
<dependency>
<groupId>ch.qos.logback</groupId>
<artifactId>logback-classic</artifactId>
<version>1.2.3</version>
</dependency>
<!-- 添加logback-core依赖 -->
<dependency>
<groupId>ch.qos.logback</groupId>
<artifactId>logback-core</artifactId>
<version>1.2.3</version>
</dependency>
</dependencies>其实依赖只需要导入mybatis,mysql即可,其他是日志、测试之类的。
1
2
3
4
5
6
7
8
9
10
11
12
13
14
15
16
17
18<configuration>
<!-- CONSOLE :表示当前的日志信息是可以输出到控制台的。 -->
<appender name="Console" class="ch.qos.logback.core.ConsoleAppender">
<encoder>
<pattern>[%level] %cyan([%thread]) %boldGreen(%logger{15}) - %msg %n</pattern>
</encoder>
</appender>
<!-- 这里要改,包名-->
<logger name="package1" level="DEBUG" additivity="false">
<appender-ref ref="Console"/>
</logger>
<!-- level:用来设置打印级别,大小写无关:TRACE, DEBUG, INFO, WARN, ERROR, ALL 和 OFF , 默认debug
<root>可以包含零个或多个<appender-ref>元素,标识这个输出位置将会被本日志级别控制。
-->
<root level="DEBUG">
<appender-ref ref="Console"/>
</root>
</configuration>注意:需要在项目的 resources 目录下创建logback的配置文件
slf4j,simple logging facade for java的缩写,翻译为java的简单日志外观。slf4j是一个开源项目,它提供我们一个一致的API来使用不同的日志框架,比如: java.util.logging,logback,log4j等。slf4j使用户可以在运行时嵌入他们想使用的日志框架。从名字中可以看出,它其实使用的是facade设计模式来实现的。
Logback是SpringBoot内置的日志处理框架,你会发现spring-boot-starter其中包含了spring-boot-starter-logging,该依赖内容就是 Spring Boot 默认的日志框架 logback。官方文档:http://logback.qos.ch/manual/
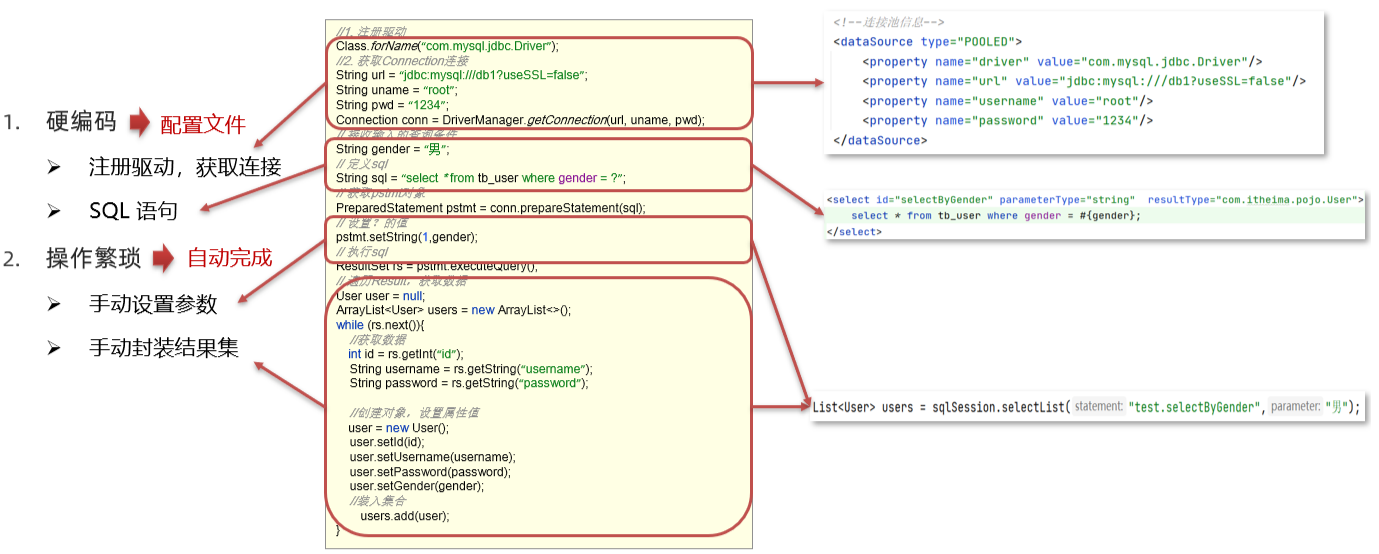
编写 MyBatis 核心配置文件 – > 替换连接信息 解决硬编码问题
在模块下的 resources 目录下创建mybatis的配置文件
mybatis-config.xml,内容如configuration【根标签】。编写 SQL 映射文件 –> 统一管理sql语句,解决硬编码问题
在模块的
resources目录下创建映射配置文件UserMapper.xml,内容如下:1
2
3
4
5
6
7
8
9
<!-- 映射配置文件 UserMapper.xml-->
<!-- namespace名称空间,该命名空间和对应mapper接口的全限定名一致-->
<mapper namespace="test">
<select id="selectAll" resultType="package1.pojo.User">
select * from tb_user;
</select>
</mapper>另外,可通过resultMap实现对数据库列名起别名,以解决数据库列名和User类属性命名法不对应问题(数据库标识符不区分大小写,采用下划线命名法,java标识符常用驼峰命名法):
1
2
3
4
5
6
7
8
9
10
11<!-- 统一起别名,resultMap标签的id为自定义的唯一标识,type为package1.pojo.User,
若核心配置有typeAliases扫描pojo包,user -->
<resultMap id="userResultMap" type="user">
<!-- 对数据库的指定列起别名-->
<result column="username" property="userName"/>
<result column="password" property="passWord"/>
</resultMap>
<!-- 起别名了,resultType改成resultMap,值为上面resultMap的id-->
<select id="selectAll" resultMap="userResultMap">
select * from tb_user;
</select>根标签【mapper】
作用:所用子标签均需书写在mapper内部
namespace与接口全路径类名【类的全限定名】一致八大子标签:
insert:定义增加SQL语句
delete:定义删除SQL语句
update:定义修改语句
select:定义查询SQL语句
sql:定义SQL语句块
resultMap:定义结果集映射【resultType解决不了时,使用resultMap】
cache:定义缓冲类
cache-ref:定义引用缓存在package1.pojo包下创建 User类
POJO(Plain Old Java Objects)译为,简单的Java对象,其实就是没有从任何类继承、也没有实现任何接口,更没有被其它框架侵入的,没有遵从特定的Java对象模型、约定或框架(如EJB)的不受任何限制的java对象。
1
2
3
4
5
6
7
8
9
10
11
12
13
14
15
16
17
18
19public class User {
private int id;
private String username;
// 下面两个passWord改成password
private String passWord;
private String gender;
private String addr;
// 省略了 setter 和 getter
public String toString() {
return "User{" +
"id=" + id +
", username='" + username + '\'' +
", passWord='" + password + '\'' +
", gender='" + gender + '\'' +
", addr='" + addr + '\'' +
'}';
}
}在package1包下编写 MybatisDemo 测试类
1
2
3
4
5
6
7
8
9
10
11
12
13
14
15
16
17
18
19
20public class Demo {
public static void main(String[] args) throws IOException {
// 1. 加载mybatis的核心配置文件,获取 SqlSessionFactory,session译为“会话”,factory译为“工厂”。
String resource = "mybatis-config.xml";
InputStream inputStream = Resources.getResourceAsStream(resource);
SqlSessionFactory sqlSessionFactory = new SqlSessionFactoryBuilder().build(inputStream);
// 2. 获取SqlSession对象,用它来执行sql
SqlSession sqlSession = sqlSessionFactory.openSession();
// sqlSession = sqlSessionFactory.openSession(true); // 设置自动提交事务,这种情况不需要手动提交事务了
// 3. 执行sql,这步不用记,一般这步都是使用mapper代理开发
sqlSession.getMapper(UserMapper.class);
// 参数是一个字符串,该字符串必须是映射配置文件的namespace.id
List<User> users = sqlSession.selectList("test.selectAll");
System.out.println(users);
// 4.要手动提交,不然会回滚事务。如果前面sqlSessionFactory.openSession(true),就不用再提交事务了
sqlSession.commit();
// 5. 释放资源
sqlSession.close();
}
}第三步执行SQL前的代码在所有案例中都是一样的,直接复制粘贴即可。而且整合Spring后就只剩mapper优化后的执行方法
回顾对比一下jdbc:
1
2
3
4
5
6
7
8
9
10
11
12
13
14
15
16
17
18
19
20
21
22
23
24
25public class Demo {
public static void main(String[] args) throws Exception {
// 1. 注册驱动
// Class.forName("com.mysql.jdbc.Driver");// 通过反射获取Driver实现类对象,从而加载驱动
// 注册驱动语句DriverManager.registerDriver(driver)在Driver的静态代码块里做过了。
// 此句仅在mysql可省略,其他数据库不能省略
// 2. 获取连接
String url = "jdbc:mysql://127.0.0.1:3306/db1?useSSL=false";
String username = "root";
String passWord = "1234";
Connection conn = DriverManager.getConnection(url, username, passWord);
// 3. 定义sql
String sql = "update student set age = 80 where name='xiaohua'";
// 4. 获取执行sql的对象 Statement
Statement stmt = conn.createStatement();
// 5. 执行sql
int count = stmt.executeUpdate(sql);//受影响的行数
// 6. 处理结果
System.out.println(count);
// 7. 释放资源
stmt.close();
conn.close();
}
}
SqlSessionFactory工具类抽取
1 | String resource = "mybatis-config.xml"; |
第三步执行SQL前的代码在所有案例中都是一样的,这些重复代码就会造成一些问题:
重复代码不利于后期的维护
SqlSessionFactory工厂类进行重复创建
资源消耗非常大但性能却非常低。
解决方案
- 代码重复可以抽取工具类
- 对指定代码只需要执行一次可以使用静态代码块
2
// sqlSession = sqlSessionFactory.openSession(true); // 设置自动提交事务,这种情况不需要手动提交事务了虽然上面语句也重复,但不能抽取到工具类里。因为SqlSession是一个连接、会话,每次连接数据库时候创建一次会话是合适,如果所有连接都共用一个会话会互相影响。
SqlSession是一个会话,相当于JDBC中的一个Connection对象,Mybatis中所有的数据库交互都由SqlSession来完成。
抽取工具类
1 | public class SqlSessionFactoryUtils { |
使用工具类
1 | SqlSessionFactory sqlSessionFactory = SqlSessionFactoryUtils.getSqlSessionFactory(); |
IDEA连接数据库
解决SQL映射文件的警告提示:
在入门案例映射配置文件中存在报红的情况:数据表显示红色
- 产生的原因:Idea和数据库没有建立连接,不识别表信息。但是大家一定要记住,它并不影响程序的执行。
- 解决方式:在Idea中配置MySQL数据库连接。
IDEA中配置MySQL数据库连接
点击IDEA右边框的
Database,在展开的界面点击+选择Data Source,再选择MySQL在弹出的界面进行基本信息的填写
点击完成后就能看到数据库编译器界面
而此界面就和
navicat工具一样可以进行数据库的操作。也可以编写SQL语句
如果发现写表名时没有提示:打开File的settings,把SQL Dialects选项的右边那个None改为你的默认数据库。
Mapper代理开发
目的
- 解决原生方式中的硬编码
- 简化后期执行SQL
1 | // 3.执行sqL |
使用mapper实现查询
定义与SQL映射文件同名的Mapper接口,并且将Mapper接口和SQL映射文件放置在同一目录下。如下图放就可以,因为编译Maven后java和resources下的目录和文件都在同一个根目录下。
注意:在resources下建多层文件夹要用斜杠,例如aa/bb,不能aa.bb。如果直接建aa.bb,则只建了一个名为aa.bb的文件夹,而不是两个。
设置SQL映射文件的namespace属性为Mapper接口全限定名:
1
2
3
4
5
6
7
8
9
<!-- 映射配置文件 UserMapper.xml-->
<!--namespace名称空间,该命名空间和对应mapper接口的全限定名一致-->
<mapper namespace="package1.mapper.UserMapper">
<select id="selectAll" resultType="package1.pojo.User">
select * from tb_user;
</select>
</mapper>在 Mapper 接口中定义方法,方法名就是SQL映射文件中sql语句的id,并保持参数类型和返回值类型一致
Mapper代理开发
1
2
3
4
5
6
7
8
9
10
11
12
13
14
15
16
17
18
19
20
21public class Demo {
public static void main(String[] args) throws IOException {
// 1. 加载mybatis的核心配置文件,获取 SqlSessionFactory
String resource = "mybatis-config.xml";
InputStream inputStream = Resources.getResourceAsStream(resource);
SqlSessionFactory sqlSessionFactory = new SqlSessionFactoryBuilder().build(inputStream);
// 2. 获取SqlSession对象,用它来执行sql
SqlSession sqlSession = sqlSessionFactory.openSession();
// 3. 执行sql
// 参数是一个字符串,该字符串必须是映射配置文件的namespace.id
// List<User> users = sqlSession.selectList("test.selectAll");
// 3.1获取UserMapper接口的代理对象
UserMapper userMapper = sqlSession.getMapper(UserMapper.class);
// 3.2调用sql方法
List<User> users = userMapper.selectAll();
System.out.println(users);
// 4. 释放资源
sqlSession.close();
}
}注意:如果Mapper接口名称和SQL映射文件名称相同,并在同一目录下,则可以使用在核心配置文件mybatis-config.xml中用包扫描的方式简化SQL映射文件的加载。示例:
1
2
3
4
5
6<mappers>
<!-- 加载sql映射文件,告诉MyBatis 去哪寻找映射SQL 的语句。-->
<!-- Maven项目编译后,java和resources下的目录和文件都在同一个跟目录下,所以路径是这样的,注意路径是/,不是.-->
<!-- <mapper resource="UserMapper.xml"/>-->
<mapper resource="package1/mapper/UserMapper.xml"/>
</mappers>简化成
1
2
3
4<mappers>
<!-- 扫描包指定name的包下所有mapper配置文件-->
<package name="package1.mapper"/>
</mappers>
配置文件实现增删改查
MybatisX插件、占位符、XML特殊字符转义
安装MybatisX插件:Setting–Plugins–MybatisX
作用是通过小鸟图标,方便mapper接口和mapper配置文件之间代码的统一。
参数占位符:参数占位符里的内容为传入的参数名,或者参数的成员变量名,或map的键名。
mybatis提供了两种参数占位符:
- #{} :执行SQL时,会将 #{} 占位符替换为?,将来自动设置参数值。底层使用的是
PreparedStatement - ${} :拼接SQL。底层使用的是
Statement,会存在SQL注入问题。
1 | <select id="selectById" resultMap="userResultMap"> |
#{}和 ${} 的区别
\#{}是预编译处理,${}是字符替换。在使用 #{}时,MyBatis 会将 SQL 中的 #{}替换成“?”,配合 PreparedStatement 的 set 方法赋值,这样可以有效防止 SQL 注入,保证程序的运行安全。
特殊字符处理:
转义字符。XML中,需要转义的字符有:
&
&<
<>
>"
"'
'CDATA区
1
2
3
4
5<select id="selectById" resultMap="userResultMap">
select * from tb_user where id <![CDATA[
>
]]> #{id};
</select>
resultMap给列起别名并查询所有
适用于数据库字段名和实体类属性名不同的情况。
SQL语句下划线命名法的列名和java实体类驼峰命名法的成员变量不同,会导致数据库给成员变量无法赋值的问题。通过resultMap标签给数据库列名起别名,可以解决这个问题。
多条件动态查询(动态SQL)
动态SQL:SQL语句随着用户的输入或外部条件的变化而变化,称为动态SQL。
Mybatis关于动态SQL的标签:
- if
- choose (when, otherwise)
- trim (where, set)
- foreach
if 标签的test 属性:逻辑表达式
为了防止出现SQL语句where 后直接跟and的情况,给所有条件加了and,并且where后跟了1=1。
1 | <select id="selectByCondition" resultMap="brandResultMap"> |
where 标签作用:
- 替换where关键字
- 会动态的去掉第一个条件前的 and
- 如果所有的参数没有值则不加where关键字
1 | <select id="selectByCondition" resultMap="brandResultMap"> |
单条件动态查询(动态SQL)
先选择,再输入查询。
choose(when,otherwise)标签类似于Java 中的switch语句,自带break。
注意:
choose-when是多选一,一项
满足条件后其他就不判断了。
可以多层判断。
1 | <select id="selectByConditionSingle" resultMap="brandResultMap"> |
添加数据
返回主键:在 insert 标签上添加如下属性
- useGeneratedKeys:是够获取自动增长的主键值。true表示获取
- keyProperty :指定将获取到的主键值封装到哪儿个属性里
1 | <insert id="add" useGeneratedKeys="true" keyProperty="id"> |
1 | brandMapper.add(brand); |
修改字段
获取到修改后的数据和id,修改此id对应的一行数据。在修改界面用户可能只修改部分属性, 所以加条件
1 | <update id="update"> |
批量删除
编写SQL时需要遍历数组来拼接SQL语句。Mybatis 提供了 foreach 标签供我们使用
foreach 标签
用来迭代任何可迭代的对象(如数组,集合)。
- collection 属性:指定遍历的数组
- mybatis会将数组参数,封装为一个Map集合。
- 默认:array = 数组,key是array而不是数组名,如collection=”array”和void deleteByIds(int[] ids);
- 用@Param注解改变map集合的默认key的名称为数组名,如collection=”ids”和void deleteByIds(@Param(“ids”) int[] ids);
- mybatis会将数组参数,封装为一个Map集合。
- item 属性:本次迭代获取到的元素,如item=”id”。
- separator 属性:集合项迭代之间的分隔符。
foreach标签不会错误地添加多余的分隔符。也就是最后一次迭代不会加分隔符。如separator=”,” - open 属性:该属性值是在拼接SQL语句之前拼接的语句,只会拼接一次。如open=”(“
- close 属性:该属性值是在拼接SQL语句拼接后拼接的语句,只会拼接一次。如close=”)”
1 | // 批量删除 |
1 | <delete id="deleteByIds"> |
Mybatis参数传递
Mybatis 接口方法中可以接收各种各样的参数,如下:
- 多个参数
- 单个参数:单个参数又可以是如下类型
- POJO 类型,传入对象
- Map 集合类型,传入map
- Collection 集合类型
- List 集合类型
- Array 类型
- 其他类型
注意:单个参数不用@Param注解起别名,会自动识别要传的参数。
mapper传参数,如果参数包括对象和散装参数,那么对象必须也注解,写SQL语句时候不能忘记
对象.属性,例如brand.status.
散装参数:使用
@Param("参数名称")标记每一个参数,在映射配置文件中就需要使用#{参数名称}进行占位1
2
3List<Brand> selectByPageAndCondition( int begin,
int size,
Brand brand);1
2
3
4
5
6<select id="selectByCondition" resultMap="brandResultMap">
select *
from tb_brand
where status = #{brand.status}
limit #{begin}, #{size}
</select>实体类封装参数:将多个参数封装成一个 实体对象 ,将该实体对象作为接口的方法参数。该方式要求在映射配置文件的SQL中使用
#{内容}时,里面的内容必须和实体类属性名保持一致。1
List<Brand> selectByCondition(Brand brand);
map集合:将多个参数封装到map集合中,将map集合作为接口的方法参数。该方式要求在映射配置文件的SQL中使用
#{内容}时,里面的内容必须和map集合中键的名称一致。1
List<Brand> selectByCondition(Map map);
注解底层,了解即可
我们在接口方法中定义多个参数,Mybatis 会将这些参数封装成 Map 集合对象,值就是参数值,而键在没有使用 @Param 注解时有以下命名规则:
以 arg 开头 :第一个参数就叫 arg0,第二个参数就叫 arg1,以此类推。如:
map.put(“arg0”,参数值1);
map.put(“arg1”,参数值2);
以 param 开头 : 第一个参数就叫 param1,第二个参数就叫 param2,依次类推。如:
map.put(“param1”,参数值1);
map.put(“param2”,参数值2);
在映射配合文件的SQL语句中使用用
arg开头的和param书写,代码的可读性会变的特别差,此时可以使用@Param注解。在接口方法参数上使用@Param注解,Mybatis 会将arg开头的键名替换为对应注解的属性值。1
User select( String username, String password);
Mybatis 在封装 Map 集合时,键名就会变成如下:
map.put(“username”,参数值1);
map.put(“arg1”,参数值2);
map.put(“param1”,参数值1);
map.put(“param2”,参数值2);
1
2
3<select id="select" resultType="user">
select * from tb_user where username=#{username} and password=#{param2}
</select>运行程序结果没有报错。而如果将
#{}中的username还是写成arg01
2
3<select id="select" resultType="user">
select * from tb_user where username=#{arg0} and password=#{param2}
</select>运行程序则可以看到报错:Parameter ‘arg0’ not found.
结论:以后接口参数是多个时,在每个参数上都使用 @Param 注解。
注解实现增删改查
如果SQL语句简单,使用注解开发会比配置文件开发更加方便。
1 |
|
注意:
- 注解后是没有分号的。
- 注解是用来替换映射配置文件方式配置的,所以使用了注解,就不需要再映射配置文件中书写对应的
statement
Mybatis 针对 CURD 操作都提供了对应的注解,已经做到见名知意。如下:
- 查询 :@Select
- 添加 :@Insert
- 修改 :@Update
- 删除 :@Delete
注意:在官方文档中 入门 中有这样的一段话:使用注解来映射简单语句会使代码显得更加简洁,但对于稍微复杂一点的语句,Java 注解不仅力不从心,还会让你本就复杂的 SQL 语句更加混乱不堪。因此,如果你需要做一些很复杂的操作,最好用 XML 来映射语句。
所以注解完成简单功能,配置文件完成复杂功能。
而我们之前写的动态 SQL 就是复杂的功能,如果用注解,就需要使用到 Mybatis 提供的SQL构建器来完成,而对应的代码如下:
1 | string sql = new SQL() {{ |
上述代码将java代码和SQL语句融到了一块,使得代码的可读性大幅度降低。
MyBatis 多数据源
一、配置双数据源
禁用Spring Boot数据源自动装配,在启动类@SpringBootApplication添加
exclude = {DataSourceAutoConfiguration.class}1
2
3
4
5
public class Application {
public static void main(String[] args) {
SpringApplication.run(Application.class, args);
}application.properties配置文件添加两个数据源配置
1
2
3
4
5
6
7
8
9
10
11spring.datasource.db1.driverClassName =oracle.jdbc.OracleDriver
spring.datasource.db1.jdbcUrl=jdbc:oracle:thin:@<db1 ip>/db1
spring.datasource.db1.username=xxx
spring.datasource.db1.password=xxx
spring.datasource.db1.platform=oracle
spring.datasource.db2.driverClassName =oracle.jdbc.OracleDriver
spring.datasource.db2.jdbcUrl=jdbc:oracle:thin:@<db2 ip>/db2
spring.datasource.db2.username=xxx
spring.datasource.db2.password=xxx
spring.datasource.db2.platform=oracle添加oracle数据源配置类PrimaryDataSourceConfig,下面的pg数据源配置类DmpDataSourceConfig,添加对应数据源的bean
PrimaryDataSourceConfig
1
2
3
4
5
6
7
public DataSource dataSource() {
log.info("config primaryDataSource success.");
return DataSourceBuilder.create().build();
}DmpDataSourceConfig
1
2
3
4
5
6
public DataSource dataSource() {
log.info("config db2DataSource success.");
return DataSourceBuilder.create().build();
}
二、配置两个Mybatis
禁用Mybatis自动装配,启动类@SpringBootApplication注解添加exclude = {DataSourceAutoConfiguration.class, MybatisAutoConfiguration.class},如上
在application.properties配置文件添加两个Mybatis的配置和对应的配置类
主数据源的mybatis配置
1
spring.datasource.db1.extend.mybatisMapperLocations=classpath:config/mybatis/mapper/*.xml
主数据源的配置类
1
2
3
4
5
6
7
8
9
10
11
12
13
14
public class PrimaryMybatisProperties {
private String mybatisMapperLocations;
public String getMybatisMapperLocations() {
return mybatisMapperLocations;
}
public void setMybatisMapperLocations(String mybatisMapperLocations) {
this.mybatisMapperLocations = mybatisMapperLocations;
}
}数据源2的配置
1
spring.datasource.db2.extend.mybatisMapperLocations=classpath:config/mybatis/mapper2/*.xml
数据源2的配置类
1
2
3
4
5
6
7
8
9
10
11
12
13
14
public class DmpMybatisProperties {
private String mybatisMapperLocations;
public String getMybatisMapperLocations() {
return mybatisMapperLocations;
}
public void setMybatisMapperLocations(String mybatisMapperLocations) {
this.mybatisMapperLocations = mybatisMapperLocations;
}
}
配置两个Mybatis的SqlSessionFactory
主数据源
1
2
3
4
5
6
7
8
9
10
11
12
13
14
15
16
17
18
19
20
21
22
23
24
25
26
27
28
29
30
31
32
33
34
35
36
37
38
39
40
41
42
43
44
45
46
47
48
public class PrimaryMybatisConfiguration {
private PrimaryMybatisProperties property;
public DataSource dataSource() {
log.info("config primaryDataSource success.");
return DataSourceBuilder.create().build();
}
public SqlSessionFactory sqlSessionFactory(
DataSource dataSource) {
try {
SqlSessionFactoryBean sessionFactory = new SqlSessionFactoryBean();
sessionFactory.setDataSource(dataSource);
sessionFactory.setMapperLocations(new PathMatchingResourcePatternResolver()
.getResources(this.property.getMybatisMapperLocations()));
log.info("config primarySqlSessionFactory success.");
return sessionFactory.getObject();
} catch (Exception e) {
log.error("config primarySqlSessionFactory failure.", e);
return null;
}
}
public SqlSessionTemplate testSqlSessionTemplate(
SqlSessionFactory sqlSessionFactory) throws Exception {
return new SqlSessionTemplate(sqlSessionFactory);
}
public DataSourceTransactionManager transactionManager(
DataSource dataSource) {
return new DataSourceTransactionManager(dataSource);
}
}数据源2
1
2
3
4
5
6
7
8
9
10
11
12
13
14
15
16
17
18
19
20
21
22
23
24
25
26
27
28
29
30
31
32
33
34
35
36
37
38
39
40
41
42
43
public class Db2MybatisConfiguration {
private Db2MybatisProperties property;
public DataSource dataSource() {
log.info("config db2DataSource success.");
return DataSourceBuilder.create().build();
}
public SqlSessionFactory sqlSessionFactory(
DataSource dataSource) {
try {
SqlSessionFactoryBean sessionFactory = new SqlSessionFactoryBean();
sessionFactory.setDataSource(dataSource);
sessionFactory.setMapperLocations(new PathMatchingResourcePatternResolver()
.getResources(this.property.getMybatisMapperLocations()));
log.info("config db2SqlSessionFactory success.");
return sessionFactory.getObject();
} catch (Exception e) {
log.error("config db2SqlSessionFactory failure.", e);
return null;
}
}
public SqlSessionTemplate testSqlSessionTemplate(
SqlSessionFactory sqlSessionFactory) throws Exception {
return new SqlSessionTemplate(sqlSessionFactory);
}
public DataSourceTransactionManager transactionManager(
DataSource dataSource) {
return new DataSourceTransactionManager(dataSource);
}
}
三、配置两个mybatis PageHelper
pagehelper spring boot AutoConfigure提供的PageHelperAutoConfiguration类,自动配置Mybatis的分页插件。因此,先禁用PageHelperAutoConfiguration类。
1 |
|
要配置两个mybatis的分页插件,需要做如下操作:
在
application.properties配置文件中添加如下两个mybatis分页插件的配置和对应的@Configuration类。
使用db1数据源的mybatis分页插件的配置文件1
2
3
4
5
6spring.datasource.db1.extend.pagehelperDialect=Oracle
spring.datasource.db1.extend.pagehelperReasonable=true
spring.datasource.db1.extend.pagehelperSupportMethodsArguments=true
spring.datasource.db1.extend.pagehelperOffsetAsPageNum=true
spring.datasource.db1.extend.pagehelperRowBoundsWithCount=true
spring.datasource.db1.extend.pagehelperParams=count=countSql;pageNum=pageNumKey;pageSize=pageSizeKey;使用db1数据源的mybatis分页插件的@Configuration类
1
2
3
4
5
6
7
8
9
10
11
12
13
public class PrimaryMybatisProperties {
private String mybatisMapperLocations;
private String pagehelperDialect;
private String pagehelperReasonable;
private String pagehelperSupportMethodsArguments;
private String pagehelperParams;
private String pagehelperOffsetAsPageNum;
private String pagehelperRowBoundsWithCount;
}使用db2数据源的mybatis分页插件的配置文件
1
2
3
4
5
6spring.datasource.db2.extend.pagehelperDialect=Oracle
spring.datasource.db2.extend.pagehelperReasonable=true
spring.datasource.db2.extend.pagehelperSupportMethodsArguments=true
spring.datasource.db2.extend.pagehelperOffsetAsPageNum=true
spring.datasource.db2.extend.pagehelperRowBoundsWithCount=true
spring.datasource.db2.extend.pagehelperParams=count=countSql;pageNum=pageNumKey;pageSize=pageSizeKey;使用db2数据源的mybatis分页插件的@Configuration类
1
2
3
4
5
6
7
8
9
10
11
12
13
public class Db2MybatisProperties {
private String mybatisMapperLocations;
private String pagehelperDialect;
private String pagehelperReasonable;
private String pagehelperSupportMethodsArguments;
private String pagehelperParams;
private String pagehelperOffsetAsPageNum;
private String pagehelperRowBoundsWithCount;
}配置两个mybatis的SqlSessionFactory,增加分页插件
PrimaryMybatisConfiguration,添加PageHelper,其余不变1
2
3
4
5
6
7
8
9
10
11
12
13
14
15
16
17
18
19
20
21
22
23
24
25
26
27
28
29
30
31public class PrimaryMybatisConfiguration {
public SqlSessionFactory sqlSessionFactory(
DataSource dataSource) {
try {
SqlSessionFactoryBean sessionFactory = new SqlSessionFactoryBean();
sessionFactory.setDataSource(dataSource);
sessionFactory.setMapperLocations(new PathMatchingResourcePatternResolver()
.getResources(this.property.getMybatisMapperLocations()));
// 分页插件
Interceptor interceptor = new PageInterceptor();
Properties properties = new Properties();
properties.setProperty("helperDialect", this.property.getPagehelperDialect());
properties.setProperty("reasonable", this.property.getPagehelperReasonable());
properties.setProperty("supportMethodsArguments",
this.property.getPagehelperSupportMethodsArguments());
properties.setProperty("params",this.property.getPagehelperParams());
interceptor.setProperties(properties);
sessionFactory.setPlugins(new Interceptor[] {interceptor});
log.info("config primarySqlSessionFactory success.");
return sessionFactory.getObject();
} catch (Exception e) {
log.error("config primarySqlSessionFactory failure.", e);
return null;
}
}
}Db2MybatisConfiguration,添加PageHelper,其余不变
1
2
3
4
5
6
7
8
9
10
11
12
13
14
15
16
17
18
19
20
21
22
23
24
25
26
27
28
29
30public class Db2MybatisConfiguration {
public SqlSessionFactory sqlSessionFactory(
DataSource dataSource) {
try {
SqlSessionFactoryBean sessionFactory = new SqlSessionFactoryBean();
sessionFactory.setDataSource(dataSource);
sessionFactory.setMapperLocations(new PathMatchingResourcePatternResolver()
.getResources(this.property.getMybatisMapperLocations()));
//分页插件
Interceptor interceptor = new PageInterceptor();
Properties properties = new Properties();
properties.setProperty("helperDialect", this.property.getPagehelperDialect());
properties.setProperty("reasonable", this.property.getPagehelperReasonable());
properties.setProperty("supportMethodsArguments",
this.property.getPagehelperSupportMethodsArguments());
properties.setProperty("params",this.property.getPagehelperParams());
interceptor.setProperties(properties);
sessionFactory.setPlugins(new Interceptor[] {interceptor});
log.info("config db2SqlSessionFactory success.");
return sessionFactory.getObject();
} catch (Exception e) {
log.error("config db2SqlSessionFactory failure.", e);
return null;
}
}
}
四、配置两个mybatis generator
在pom.xml中引入mybatis generator
1
2
3
4
5
6
7
8
9
10
11
12
13
14
15
16
17<!-- mybatis generator 自动生成代码插件 -->
<plugin>
<groupId>org.mybatis.generator</groupId>
<artifactId>mybatis-generator-maven-plugin</artifactId>
<version>1.3.2</version>
<configuration>
<overwrite>true</overwrite>
<verbose>true</verbose>
</configuration>
<dependencies>
<dependency>
<groupId>com.oracle.jdbc</groupId>
<artifactId>ojdbc7</artifactId>
<version>12.1.0.1</version>
</dependency>
</dependencies>
</plugin>配置2个mybatis generator配置文件。
使用db1数据源的mybatis generator的配置文件generatorConfig.xml
使用db1数据源的mybatis generator的配置文件generatorConfig2.xml使用mvn执行mybatis generator命令。
1
2
3
4# 使用db1数据源的mybatis generator生成代码命令
mvn -Dmybatis.generator.configurationFile=src/main/resources/generatorConfig.xml mybatis-generator:generate
# 使用db2数据源的mybatis generator生成代码命令
mvn -Dmybatis.generator.configurationFile=src/main/resources/generatorConfig2.xml mybatis-generator:generate
MyBatis 编写自定义插件
MyBatis 分页插件的实现原理
分页插件的基本原理是使用 MyBatis 提供的插件接口,实现自定义插件,在插件的拦截方法内拦截待执行的 SQL,然后重写 SQL,根据 dialect 方言,添加对应的物理分页语句和物理分页参数。
自定义插件实现原理
MyBatis 自定义插件针对 MyBatis 四大对象(Executor、StatementHandler、ParameterHandler、ResultSetHandler)进行拦截:
Executor:拦截内部执行器,它负责调用 StatementHandler 操作数据库,并把结果集通过 ResultSetHandler 进行自动映射,另外它还处理了二级缓存的操作;
StatementHandler:拦截 SQL 语法构建的处理,它是MyBatis直接和数据库执行 SQL脚本的对象,它也实现了 MyBatis 的一级缓存;
ParameterHandler:拦截参数的处理;
ResultSetHandler:拦截结果集的处理。
自定义插件实现关键
MyBatis插件要实现 Interceptor 接口,接口包含的方法,如下代码所示:setProperties 方法:在 MyBatis 进行配置插件的时候可配置自定义相关属性,即:接口实现对象的参数配置;plugin 方法:插件用于封装目标对象的,通过该方法我们可以返回目标对象本身,也可以返回一个它的代理,可以决定是否要进行拦截进而决定要返回一个什么样的目标对象,官方提供了示例:return Plugin. wrap(target, this);intercept 方法:是要进行拦截的时候要执行的方法。
1 | public interfaceInterceptor{ |
相关问题
MyBatis 的分页方式
分页方式:逻辑分页和物理分页。
- 逻辑分页:使用
MyBatis自带的RowBounds进行分页,它是一次性查询很多数据,然后在数据中再进行检索。 - 物理分页:手写 SQL 分页或使用分页插件
PageHelper,去数据库查询指定条数的分页数据的形式。
MyBatis 逻辑分页和物理分页的区别
逻辑分页是一次性查询很多数据,然后在结果中检索分页的数据。这样需要消耗大量的内存、有内存溢出的风险、对数据库压力较大。
物理分页是从数据库查询指定条数的数据,弥补了一次性全部查出的所有数据的缺点,如需要大量内存,数据库查询压力较大等问题。
RowBounds 是一次性查询全部结果吗?为什么?
RowBounds 表面是在“所有”数据中检索数据,其实并非是一次性查询出所有数据,因为 MyBatis 是对 jdbc 的封装,在 jdbc 驱动中有一个 Fetch Size 的配置,它规定了每次最多从数据库查询多少条数据,假如你要查询更多数据,它会在你执行 next()的时候,去查询更多的数据。
就好比去自动取款机取 10000 元,但取款机每次最多能取 2500 元,所以你要取 4 次才能把钱取完。只是对于 jdbc 来说,当你调用 next()时会自动完成查询工作。这样做的好处可以有效防止内存溢出。
MyBatis 是否支持延迟加载及延迟加载的原理
MyBatis 支持延迟加载,设置 lazyLoadingEnabled=true 。
延迟加载的原理是调用的时候触发加载,而不是在初始化的时候就加载信息。
比如调用 a. getB(). getName(),这个时候发现 a. getB() 的值为 null,此时会单独触发事先保存好的关联 B 对象的 SQL,先查询出来 B,然后再调用 a. setB(b),而这时候再调用 a. getB(). getName() 就有值了,这就是延迟加载的基本原理。
MyBatis 的一级缓存和二级缓存
一级缓存:基于PerpetualCache的HashMap本地缓存,其声明周期和 SQLSession 一致,有多个 SQLSession 或者分布式的环境中数据库操作,可能会出现脏数据。当 Session flush 或 close 之后,该 Session 中的所有 Cache 就将清空,默认一级缓存开启。
二级缓存:也是基于 PerpetualCache 的 HashMap 本地缓存,不同在于其存储作用域为 Mapper 级别的,如果多个SQLSession之间需要共享缓存,则需要使用到二级缓存,并且二级缓存可自定义存储源,如 Ehcache。默认不打开二级缓存,**要开启二级缓存,使用二级缓存属性类需要实现 Serializable 序列化接口(可用来保存对象的状态)**。
开启二级缓存数据查询流程:二级缓存 -> 一级缓存 -> 数据库。
缓存更新机制:当某一作用域(一级缓存Session/二级缓存Mapper)进行C/U/D 操作后,默认该作用域下所有select中的缓存将被clear。
MyBatis 和 hibernate 的区别
灵活性:MyBatis 更加灵活,自己可以写 SQL 语句,使用起来比较方便。
可移植性:MyBatis 有很多自己写的 SQL,因为每个数据库的 SQL 可以不相同,所以可移植性比较差。
学习和使用门槛:MyBatis 入门比较简单,使用门槛也更低。
二级缓存:hibernate 拥有更好的二级缓存,可以自行更换为第三方的二级缓存。
MyBatis 有哪些执行器(Executor)
MyBatis 有三种基本的Executor执行器:SimpleExecutor:每执行一次 update 或 select 就开启一个 Statement 对象,用完立刻关闭 Statement 对象;ReuseExecutor:执行 update 或 select,以 SQL 作为 key 查找 Statement 对象,存在就使用,不存在就创建,用完后不关闭 Statement 对象,而是放置于 Map 内供下一次使用。简言之,就是重复使用 Statement 对象;
**BatchExecutor:*执行 update(没有 select,jdbc 批处理不支持 select),将所有 SQL 都添加到批处理中(addBatch()),等待统一执行(executeBatch()),它缓存了多个 Statement 对象,每个 Statement 对象都是 addBatch()完毕后,等待逐一执行 executeBatch()批处理*,与 jdbc 批处理相同。