JAVA I/O流
java.io是Java编程语言中处理输入输出(I/O)操作的核心类库,定义了数据流模型与多种接口,支持文件操作、网络通信及对象序列化等功能。其通过流(Stream)机制实现数据传输,涵盖字节流、字符流与缓冲处理等设计,为Java标准库的重要组成部分。
该库将数据源抽象为输入流和输出流,按传输方向分为输入型与输出型,按单位分为字节流(8位字节处理)与字符流(16位字符处理)。功能上包含直接操作设备的节点流和增强功能的过滤流,核心类包括InputStream、OutputStream、Reader、Writer四个抽象类及其子类,形成分层结构的I/O处理体系。
参考原文:全网最完整Java学习笔记
基本介绍
什么是I/O流
I/O流(Input/Output Stream),即输入(Input)和输出(Output)流,是用于处理输入和输出操作的数据流。在Java中,一般用IO流写一个文件输出到操作系统中,或者从操作系统中输入一个文件进行读取。
IO流分类:
按数据流向:
- 输入流:读数据。
- 输出流:写数据。
按数据类型:
- 字节流:它处理单元为1个字节(byte),操作字节和字节数组,存储的是二进制文件。
- 使用场景:在Java中,一般用IO流写一个文件输出到操作系统中,或者从操作系统中输入一个文件进行读取。如果是音频文件、图片、歌曲,就用字节流(1byte = 8位)。
- 字符流:它处理的单元为2个字节的
Unicode字符,分别操作字符、字符数组或字符串,字符流是由Java虚拟机将字节转化为2个字节的Unicode字符为单位的字符而成的。- 使用场景:如果是关系到中文(文本)的,用字符流(1Unicode = 2字节 = 16位);
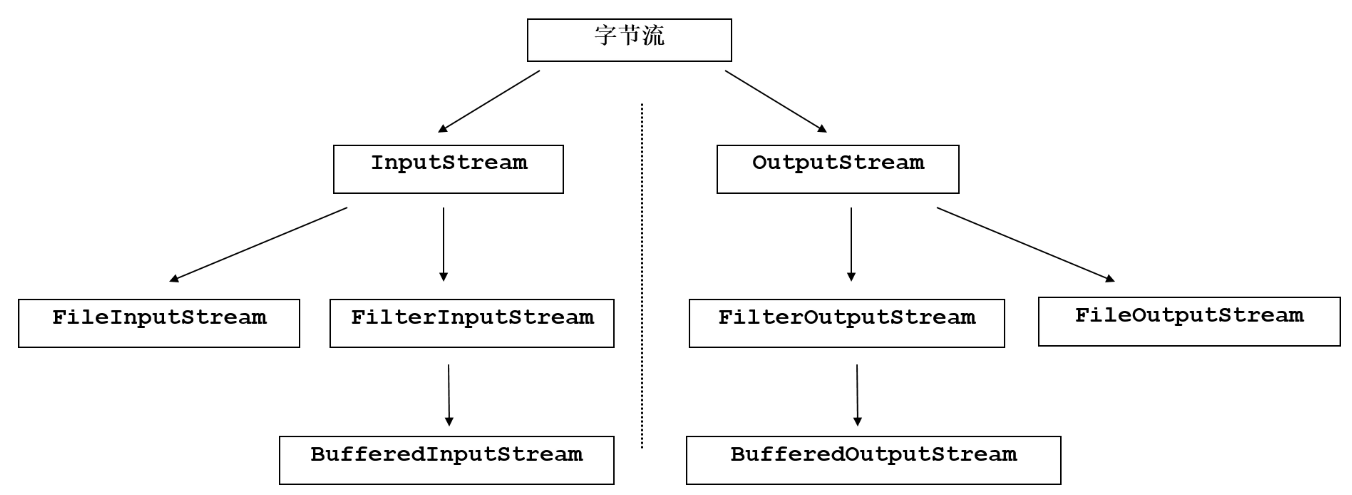
字节流
输入字节流 (InputStream)
- **
FileInputStream**:基本的文件输入流,用于读取字节文件(如图片、视频)中的数据。 - **
FilterInputStream**:过滤输入流,是所有过滤输入流的父类。用于对数据进行解密、校验、转换、过滤、缓存。因为它是抽象类,所以我们一般用它的子类:- **
BufferedInputStream**:相比于FileInputStream,它的读取性能会高很多。因为它多了一个缓冲区数组(在内存中),在第一次调用read()读取数据时,他会将数据尽可能多的填满缓冲区,这样再次read()时会优先从缓冲区中读,而不用直接在磁盘中读。我们知道内存读写性能是远高于磁盘的,所以它更快。默认缓冲区大小是8192字节,即8KB,超过这个容量就必须在磁盘读取了。 - **
DataInputStream**:与相比于FileInputStream,它的读取性能会高很多。因为它直接提供了读取Java中基本数据类型的方法,如 readInt()、readDouble()、readUTF() 等,而不需要额外的解析步骤。 - **
SocketInputStream**:网络输入流。
- **
输出字节流 (OutputStream)
- **
FileOutputStream**:基本的文件输出流,用于将数据写入字节文件(如图片、视频)。 - **
FilterOutputStream**:过滤输出流,是所有过滤输出流的父类,提供了基本的输出流功能。用于压缩数据、加密数据等。因为它是抽象类,所以我们一般用它的子类:- **
BufferedOutputStream**:为输出流提供缓冲功能,提高写入效率。每次写入数据时,先写进缓冲区,缓冲区满了会自动刷新写入到磁盘中,也可以手动调用flash()方法刷新。 - **
DataOutputStream**:性能高,因为它直接提供了写入Java中基本数据类型的方法,如 wirteInt(),而不需要额外的转换步骤。 - SocketOutputStream;
- **
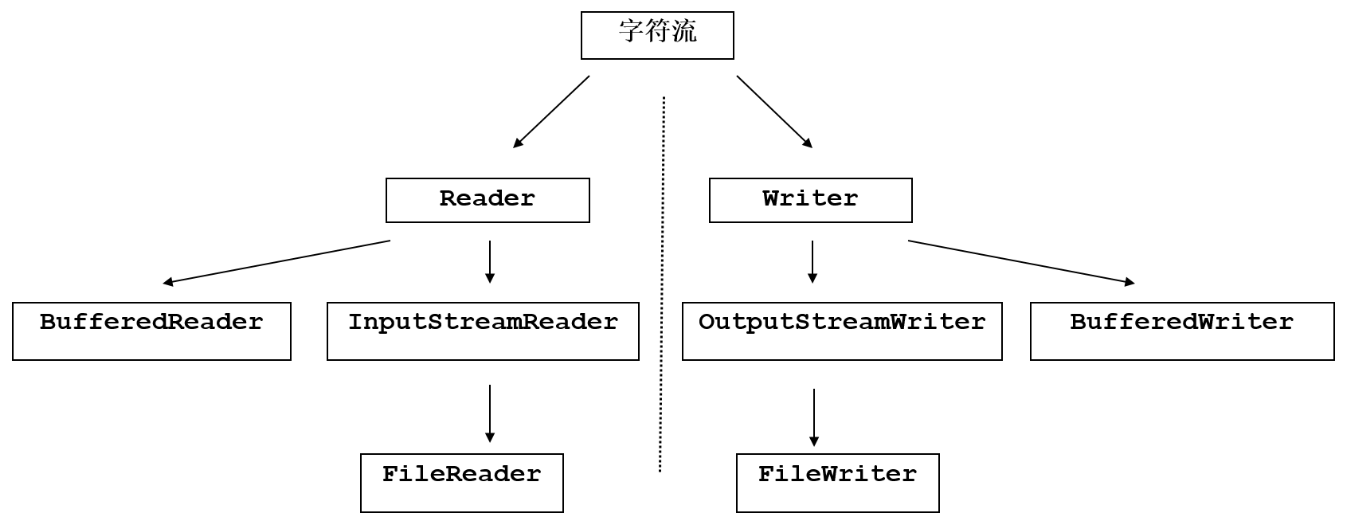
字符流
字符流是以字符为单位处理数据的流,分为输入字符流和输出字符流。
输入字符流 (Reader)
- **
InputStreamReader**:输入流读取类,用于将字节流转换为字符流再读取字符数据。使用系统默认字符编码。 - **
FileReader**:文件读取类,用于直接从文件中读取字符数据。可以指定字符编码来解码字节流。 - **
BufferedReader**:为字符输入流提供缓冲功能,提高读取效率。
输出字符流 (Writer)
- **
OutputStreamWriter**:将字符流转换为字节流。 - **
FileWriter**:用于将字符数据写入文件。 - **
BufferedWriter**:为字符输出流提供缓冲功能,提高写入效率。
File类
File类是用于表示文件和目录路径名的类。
注意:File类封装的不是真正的文件,只是路径。所以File类可以对文件进行创建、删除、重命名、修改时间、文件大小等操作,但不能对文件里的数据进行读取或者写入,它一般作为输入输出流的构造参数,指明文件的路径。
创建文件示例
1 | public class Demo { |
文件默认路径:
在当前包内IO流,使用File类创建文件时
默认存的位置是在项目文件夹下,而不是包文件夹下。
关于路径斜杠和反斜杠:
路径斜杠可以是//,/,\,不能是\,因为它是转义符。
正斜杠“/”和“//”都可以,反斜杠必须“\”,因为“\”会ASCII转义,“\”在字符串里才是“\”。
2
3
4
5
6
7
8
File file1 = new File("D:/1/2.txt");
File file2 = new File("D:\\1\\3.txt");
// File file3 = new File("D:\1\4.txt"); // 这样会报错,单个反斜杠会进行转义
System.out.println(file.createNewFile()); // true
System.out.println(file1.createNewFile()); // true
System.out.println(file2.createNewFile()); // true
// System.out.println(file3.createNewFile()); // false查看当前路径:
常用方法:
- **
boolean createNewFile()**: 当且仅当具有该名称的文件尚不存在时,原子地(保证线程安全)创建一个由该抽象路径名命名的新空文件。抽象路径名指的是构造 File 对象时传递的路径名字符串。创建File对象时,构造参数的路径并不一定真实存在,可能是虚拟的、等待通过createNewFile等方法进行创建。 boolean mkdir():创建目录。如果父目录不存在,则不会创建目录,并返回 false。- **
boolean mkdirs()**: 创建目录。如果父目录不存在,它会一并创建。 - **
boolean delete()**: 删除文件或目录。成功删除文件或目录时返回 true,否则返回 false。注意如果要删除目录,该目录必须为空,否则会返回false。 - **
boolean isDirectory()**: 测试File是否为目录。 - **
boolean isFile()**: 测试File是否为文件。 - **
boolean exists()**: 测试File是否真实存在。 - **
String getAbsolutePath()**: 返回绝对路径名字符串。 - **
String getPath()**: 将抽象路径名。也就是构造 File 对象时传递的路径名字符串,可能是绝对路径,也可能是相对路径。 - **
String getName()**: 返回由此抽象路径名表示的文件或目录的名称。 - **
String[] list()**: 返回对应目录下所有文件的文件名数组。 - **
File[] listFiles()**: 返回对应目录下所有文件的File文件数组。
举例:
1 | public static void main(String[] args) { |
字节流的超类
字节输出流OutputStream
概念:
Java中的 InputStream 和 OutputStream 都是 io 包中面向字节操作的顶级抽象类。所有字节流类都是他们的子类。
子类:
- 网络数据传输:SocketOutputStream
- 文件操作:
FileOutputStream - 字节数据操作:DataOutputStream
常用api:
void close():关闭此输出流并释放与此流相关联的任何系统资源。void flush():刷新此输出流并强制任何缓冲的输出字节被写出。void write(byte[] b):将 b.length 字节从指定的字节数组写入此输出流。void write(byte[] b, int off, int len): 从指定的字节数组写入 len 个字节,从偏移 off 开始输出到此输出流。abstract void write(int b):将指定的字节写入此输出流。
字节输入流InputStream
概念:
Java中的 InputStream 和 OutputStream 都是 io 包中面向字节操作的顶级抽象类,关于java同步 io字节流的操作都是基于这两个的。
子类:
- 网络数据传输:SocketInputStream
- 文件操作:FileInputStream
- 字节数据操作:DataInputStream。与相比于FileInputStream,它的读取性能会高很多。因为它直接提供了读取Java中基本数据类型的方法
- 带缓冲区的输入流:BufferedInputStream
常用api:
- **
abstract int read()**:从输入流读取数据的下一个字节。 - **
int read(byte[] b)**:从输入流读取一些字节数,并将它们存储到缓冲区 b,返回值为长度 。 - **
int read(byte[] b, int off, int len)**:从输入流读取最多 len字节的数据到一个字节数组。
字节文件流
文件输出流FileOutputStream
基本的文件输出流,用于将数据写入字节文件(如图片、视频)。输出流是写数据,把数据输出到文件里。
构造方法:
- **
FileOutputStream(File file)**:创建文件输出流以写入由指定的 File对象表示的文件。 - **
FileOutputStream(String name)**:创建文件输出流以指定的名称写入文件 - **
FileOutputStream(String name, boolean append)**:创建文件输出流以指定的名称写入文件。append默认是false,即彻底覆盖写入。append为true时是追加写入。 FileOutputStream(File file, boolean append): 使用文件对象创建文件输出流,并选择是否追加数据。
写操作方法
void write(int b): 将指定的字节写入输出流。void write(byte[] b): 将字节数组 b 写入输出流。void write(byte[] b, int off, int len): 将字节数组 b 中从偏移量 off 开始的 len 个字节写入输出流。
关闭方法
void close(): 关闭文件输出流并释放与此流有关的所有系统资源。
示例,将“abcde” 写入1.txt文件中:
1 | public class Test { |
注意:写数据时的换行符,windows系统下是\r\n,linux的换行是\n,mac换行\r.
文件输入流 FileInputStream
基本的文件输入流,用于读取字节文件(如图片、视频)中的数据。
常用方法:
- **
FileInputStream(File file)**:构造方法,创建一个 FileInputStream,它读取从指定File对象的文件。 - **
FileInputStream(String name)**:构造方法,创建一个 FileInputStream,它读取从指定文件路径名的文件 - **
int read()**:读取一个字节的数据。返回的int是读取字节的个数,如果到达流的末尾,则返回值 -1。 - **
int read(byte[] b)**:读取一定字节(0~b.length,具体长度取决于是否读到了末尾)的数据,将其存储在缓冲区数组 b 中。返回读取的字节数,如果没有可用的字节,则返回 -1。 - **
int read(byte[] b, int off, int len)**:最多读取 len 个字节的数据到一个字节数组。尝试读取最多 len 个字节的数据到缓冲区 b 中,从 off 位置开始。返回读取的字节数,如果没有可用的字节,则返回 -1。
代码示例:通过文件输入输出流复制图片
1 | public class Test { |
扩展
使用maven后可以导入commons-io包,直接通过工具类复制。
使用IOUtils.copy(fis,os)进行流的复制(推荐)
(1)pom.xml添加依赖
2
3
4
5
<groupId>commons-io</groupId>
<artifactId>commons-io</artifactId>
<version>2.6</version>
</dependency>(2)调用工具类方法实现复制
2
3
//os:输出流
IOUtils.copy(fis,os);
字节缓冲流(推荐)
特点:
字节缓冲流仅提供缓冲区,真正读写数据还要靠基本字节流对象操作。
字节缓冲流读写数据比基本字节流快很多,因为它有个存在内存中的字节数组,作为缓冲区,读写时先在缓冲区中读写,性能比直接在磁盘中读写快很多。
字节缓冲输出流BufferedOutputStream
**BufferedOutputStream**是一个带缓冲区的输出流,它跟FileOutputStream一样,都继承自OutputStream抽象类。
与普通的OutputStream相比,BufferedOutputStream在写入数据时使用了一个存在内存中的中间缓冲区。当向BufferedOutputStream写入数据时,数据首先会被写入到缓冲区,而不是直接写入到目标输出流(即最终的目标输出,比如文件、网络连接、控制台)。当缓冲区满了、手动刷新flash()、手动关闭close()时,BufferedOutputStream会将缓冲区中的数据一次性写入到目标输出流中。
这种缓冲机制可以减少实际的物理写操作,从而提高写操作的效率。因为磁盘IO是很慢的,而内存IO是很快的,相比于每次写入一个字节到目标输出流,将多个字节一次性写入会更加高效,磁盘IO次数有效减少。
构造方法
BufferedOutputStream(OutputStream out):创建一个新的缓冲输出流,以将数据写入指定的底层输出流。- **
BufferedOutputStream(OutputStream out, int size)**:创建一个新的缓冲输出流,以将数据写入指定的底层输出流,并具有指定的缓冲区大小。
写入方法
- **
void write(int b)**:将指定的字节写入此缓冲输出流。 - **
void write(byte[] b, int off, int len)**:将字节数组中的指定字节写入此缓冲输出流。
刷新方法
**
void flush()**:刷新此缓冲输出流,将任何缓冲的输出字节写出到底层输出流。
关闭方法**
void close()**:关闭此输出流并释放与此流相关联的任何系统资源。在关闭流之前,会刷新它。
构造方法**
BufferedInputStream(InputStream in)**:创建一个新的缓冲输入流,以从指定的底层输入流读取数据。**
BufferedInputStream(InputStream in, int size)**:创建一个新的缓冲输入流,以从指定的底层输入流读取数据,并具有指定的缓冲区大小。
读取方法
- **
int read()**:从输入流中读取数据的下一个字节。 - **
int read(byte[] b, int off, int len)**:从输入流中将最多 len 个字节的数据读入一个字节数组。 - **
int read(byte[] b)**:从输入流中读取一定数量的字节,并将其存储在缓冲区数组 b 中。
跳过和可用
- **
long skip(long n)**:跳过和丢弃输入流中最多 n 个字节的数据。 - **
int available()**:返回可以不受阻塞地从输入流中读取的剩余字节数。阻塞(Blocking) 是指程序在等待某些操作完成(例如读取数据、写入数据、获取网络响应等)时停止执行其他操作,直到该操作完成。
标记和重置
- **
void mark(int readlimit)**:在输入流中标记当前位置。 - **
void reset()**:将流重新定位到上次调用 mark 方法时的位置。 - **boolean markSupported()**:测试输入流是否支持 mark 和 reset 方法。
关闭
- **
void close()**:关闭输入流并释放与此流相关联的任何系统资源。
字节缓冲输入流BufferedInputStream
BufferedInputStream是字节缓冲输入流。
相比于FileInputStream,它的读取性能会高很多。因为它多了一个缓冲区数组(在内存中),在第一次调用read()读取数据时,他会将数据尽可能多的填满缓冲区,这样再次read()时会优先从缓冲区中读,而不用直接在磁盘中读。
内存读写性能是远高于磁盘的,所以它更快。默认缓冲区大小是8192字节,即8KB,超过这个容量就必须在磁盘读取了。
代码示例:使用缓冲流复制图片
1 | public class Test { |
字符流
继承关系
字符流的继承关系:
字符流的编码和解码
为什么要用字符流
因为字节流编码不支持汉字。 计算机底层存储数据都是通过二进制的字节文件存储的,所以我们看到的文件信息都是有多少字节、多少KB、多少MB,文本文件需要设置编码是UTF-8、GBK等类型。
GBK编码,一个汉字占用2个字节。
utf-8编码,一个汉字占用3个字节。
一个英文字符占一个字节,一个汉字占多个字节,因为字节流都是单字节读取,所以字节流在读中文的时候有可能会读到半个中文,造成乱码,所以这就引入了字符流。
字符流对字节文件进行编码和解码:
- 编码:字符输出流将字符编码为字节写入字节文件
- 解码:字符输入流从字节文件解码出字符。
这样可以保证写入文件时,写入的格式是字节文件,读取文件时,将字节文件转为字符文件。
字符串的编码解码方法: 字符串的编码和解码是指在不同字符集之间转换字符数据的过程。
- 编码:将字符串转换为字节数组
- 解码:将字节数组转换为字符串。
2
3
4
5
6
7
8
9
10
11
12
13
14
String str = "你好";
// 编码
byte[] bytes = str.getBytes("UTF-8");
// 解码
String bytesToString = new String(bytes, "UTF-8");
System.out.println(bytesToString);
// 如果编码设置的不对,设为GBK就会乱码:浣犲ソ
String bytesToString2 = new String(bytes, "GBK");
System.out.println(bytesToString2);
}
// 输出结果
// 你好
// 浣犲ソ
字符输入输出流
字符输出流OutputStreamWriter
OutputStreamWriter:将字符编码为字节,再写入字节文件。
OutputStreamWriter 是 Java 中一个桥接器类,用于将字符流转换为字节流。它使用指定的字符编码将字符写入字节流。它可以用于写入文件、网络流等。
桥接器类:指充当中介,用于连接或转换两种不兼容类型的类
构造方法:构造参数都有OutputStream,因为要讲字符流编码成字节流OutputStream
OutputStreamWriter(OutputStream out): 创建一个使用默认字符编码的 OutputStreamWriter。OutputStreamWriter(OutputStream out, String charsetName): 创建一个使用指定字符编码的 OutputStreamWriter。OutputStreamWriter(OutputStream out, Charset cs): 创建一个使用指定 Charset 的 OutputStreamWriter。- OutputStreamWriter(OutputStream out, CharsetEncoder enc): 创建一个使用指定 CharsetEncoder 的 OutputStreamWriter。
写入方法
void write(int c): 写入单个字符。void write(char[] cbuf, int off, int len): 写入字符数组的一部分。void write(char[] cbuf): 写入字符数组。void write(String str, int off, int len): 写入字符串的一部分。void write(String str): 写入整个字符串。
代码示例:
1 | public static void main(String[] args) throws IOException { |
字符输入流InputStreamReader
InputStreamReader 是 Java 中一个桥接器类,用于从字节文件解码出字符。因为计算机底层存储的数据都是二进制的字节码文件,所以我们要读取文本文件,就需要将其根据编码解析成字符流,才能读取文件中的内容。
构造方法:构造参数都有InputStream,因为InputStreamReader作用是将字节文件转为字符
InputStreamReader(InputStream in): 使用默认字符集将给定的输入流 in 转换为字符流。InputStreamReader(InputStream in, Charset cs): 使用指定的字符集 cs 将给定的输入流 in 转换为字符流。
读取字符:
int read(): 读取单个字符并返回其 Unicode 编码,如果到达流的末尾,则返回 -1。int read(char[] cbuf, int offset, int length): 字符读入数组 cbuf,从 offset 位置开始存放,最多读取 length 个字符。
其他方法:
void mark(int readAheadLimit): 标记流的当前位置,最多可以在流中读取 readAheadLimit 个字符。void reset(): 将流重置到最后一次标记的位置。boolean markSupported(): 测试此输入流是否支持标记功能。void close(): 关闭流并释放与之关联的所有系统资源。
代码示例:
1 | public static void main(String[] args) throws IOException { |
FileWriter和FileReader:简化字符流
FileWriter是OutputStreamWriter的子类,FileReader是InputStreamReader的子类。这两个类的作用是简化字符输入输出流的构造方法。
看看FileReader的源码,可以看到它继承了InputStreamReader类,并且只有三个构造方法,这几个构造方法封装了super(new FileInputStream(fileName或者file));,从而可以让我们直接将文件名或者File对象作为构造参数,而不需要再麻烦的创建一个FileInputStream对象,再将它作为构造参数创建InputStreamReader对象了。
1 | package java.io; |
下面两段代码效果是一样的,都是创建字符输入流,明显FileReader更方便:
InputStreamReader创建字符输入流方式:
2
3
4
FileInputStream fis = new FileInputStream("D://output.txt");
// 创建使用 UTF-8 编码的 InputStreamReader
InputStreamReader isr = new InputStreamReader(fis, "UTF-8");FileReader创建字符输入流方式:
除了构造方法外,其他方法和他们的父类一致,这里不再赘述。
FileReader构造方法
FileReader(String fileName): 创建一个新的 FileReader,读取指定文件。FileReader(File file): 创建一个新的 FileReader,读取指定的 File 对象。
FileWriter构造方法
FileWriter(String fileName): 创建一个使用默认字符编码的 FileWriter,将数据写入指定文件。如果文件不存在,则创建新文件;如果文件存在,则覆盖原有内容。FileWriter(String fileName, boolean append): 创建一个使用默认字符编码的 FileWriter,将数据写入指定文件。若 append 为 true,则在文件末尾追加内容,而不是覆盖。FileWriter(File file): 创建一个 FileWriter,将数据写入指定的 File 对象。FileWriter(File file, boolean append): 创建一个 FileWriter,将数据写入指定 File 对象,并选择是否在文件末尾追加。
代码示例:
1 | public static void main(String[] args) throws IOException { |
字符缓冲流(推荐)
BufferedWriter和BufferedReader是带缓冲区的字符流,读写效率相对于普通的字符流OutputStreamWriter和InputStreamReader会高很多。
为什么字符缓冲流读写效率高?
原因跟字节缓冲流类似,它维护了默认容量8192容量的char类型数组,在写入时会将字符先写进这个存于内存的数组中,等容量满了之后,会一次性将数据写进磁盘,而不是每次写数据都进行磁盘IO一次,有效降低了读写次数,又因为磁盘的IO效率是远低于内存IO效率的,所以字符缓冲流的写效率高。
BufferedReader也一个道理,它在第一次读的时候将数据尽可能多的塞满char类型数组,下次读的时候优先从char数组中读,读的效率肯定比直接在磁盘中读的效率高很多。
BufferedWriter
构造方法
BufferedWriter(Writer out): 创建一个使用默认大小输出缓冲区的缓冲字符输出流。默认值8192足够大,可用于大多数用途。
1
2
3
4public BufferedWriter(Writer out) {
// 没指定缓冲区容量时,默认是最大长度8192
this(out, defaultCharBufferSize);
}BufferedWriter(Writer out, int sz): 创建一个使用指定大小输出缓冲区的缓冲字符输出流。参数sz可以指定缓冲区大小,或者可以接受默认大小8192。
常用方法
void write(int c): 写入单个字符。void write(char[] cbuf, int off, int len): 写入字符数组的某一部分。void write(String s, int off, int len): 写入字符串的某一部分。void newLine(): 写入一个行分隔符。```java
public void newLine() throws IOException {// lineSeparator是本类的一个属性,在构造函数执行时获取当前操作系统的行分隔符并赋值 write(lineSeparator);}
1
2
3
4
5
6
7
8
9
10
11
12
13
14
15
16
17
18
19
20
21
22
23
24
25
26
27
28
29
30
31
32
33
34
35
36
37
38
39
40
41
42
43
44
45
46
47
48
49
50
51
52
53
54
55
- **`void flush()`: 刷新该流的缓冲区。**每次写完bw.flush();可以将缓冲字符写入文本,虽然close()也能刷新后关闭,但加上flush更保险。

- **`void close()`**: 关闭该流,但要先刷新它。

**BufferedReader**

**构造方法**:可以指定缓冲区大小,或者可以使用默认大小8192。 默认值足够大,可用于大多数用途。

- **`BufferedReader(Reader in)`**: 创建一个使用默认大小输入缓冲区的缓冲字符输入流。
- **`BufferedReader(Reader in, int sz)`**: 创建一个使用指定大小输入缓冲区的缓冲字符输入流。

**常用方法**

- **`int read()`**: 读取单个字符。
- **`int read(char[] cbuf, int off, int len)`**: 将字符读入数组的某一部分。
- **`String readLine()`**: 读取一个文本行。
- **`boolean ready()`**: 判断输入流是否准备好被读取。
- **`void close()`**: 关闭该流并释放与之关联的所有资源。

**代码示例**:

BufferedWriter写入三行文字,然后BufferedReader读出来:

```java
public static void main(String[] args) {
    // 定义文件路径
    String filePath = "example.txt";
    // 使用 BufferedWriter 写文件
    // 使用JDK7的异常处理形式,就不需要finally里关闭流对象了,出异常后系统会自动关闭
    try (BufferedWriter bw = new BufferedWriter(new FileWriter(filePath))) {
        bw.write("你好");
        bw.newLine();
        bw.write("世界");
        bw.newLine();
        bw.write("宇宙");
    } catch (IOException e) {
        // 实际场景建议用logger.error(),而不是e.printStackTrace()
        e.printStackTrace();
    }

    // 使用 BufferedReader 读文件
    try (BufferedReader br = new BufferedReader(new FileReader(filePath))) {
        String line;
        while ((line = br.readLine()) != null) {
            System.out.println(line);
        }
    } catch (IOException e) {
        e.printStackTrace();
    }
}
// 输出结果
// 你好
// 世界
// 宇宙
BufferedReader实现读取键盘录入:
代码示例:
2
3
4
5
6
7
8
9
10
11
12
13
14
15
16
17
18
19
20
21
22
23
24
25
26
// 使用 InputStreamReader 包装 System.in,再使用 BufferedReader 包装 InputStreamReader
BufferedReader br = new BufferedReader(new InputStreamReader(System.in));
// 提示用户输入
System.out.println("请输入一些文字:");
// 读取用户输入并输出
try {
String input = br.readLine();
System.out.println("你输入的是:" + input);
} catch (IOException e) {
e.printStackTrace();
} finally {
// 关闭 BufferedReader
try {
if (br != null) {
br.close();
}
} catch (IOException e) {
e.printStackTrace();
}
}
}
// 打印结果
// 请输入一些文字:
// 123
// 你输入的是:123
I/O流JDK7异常处理
I/O流的异常处理:
JDK7之前的常规做法:try…catch…finally
1 | try { |
JDK7改进方案:try-with-resources
因为之前方案,每次都要finally中再次判空、try-catch区关闭IO流,太过麻烦,所以JDK7引入了新的异常处理形式,可以把流对象放到try()的括号里,这样就不需要再写finally了,系统会自动释放资源
1 | try (定义流对象) { |
代码示例:
使用字符缓冲流写文件后,读文件:
JDK7之前格式:
异常处理后,需要在finally里关闭流对象:
2
3
4
5
6
7
8
9
10
11
12
13
14
15
16
17
18
19
20
21
22
23
24
25
26
27
28
29
30
31
32
33
34
35
36
37
38
39
40
41
42
43
44
45
46
// 定义文件路径
String filePath = "example.txt";
// 使用 BufferedWriter 写文件
BufferedWriter bw = null;
try {
bw = new BufferedWriter(new FileWriter(filePath));
bw.write("Hello, World!");
bw.newLine();
bw.write("Welcome to Java BufferedWriter.");
bw.newLine();
bw.write("This is an example of BufferedWriter.");
} catch (IOException e) {
// 实际场景建议用logger.error(),而不是e.printStackTrace()
e.printStackTrace();
} finally {
if (bw != null) {
// 关闭流时也需要异常处理,防止关闭失败
try {
bw.close();
} catch (IOException e) {
e.printStackTrace();
}
}
}
// 使用 BufferedReader 读文件
BufferedReader br = null;
try {
br = new BufferedReader(new FileReader(filePath));
String line;
while ((line = br.readLine()) != null) {
System.out.println(line);
}
} catch (IOException e) {
e.printStackTrace();
} finally {
if (br != null) {
try {
br.close();
} catch (IOException e) {
e.printStackTrace();
}
}
}
}JDK7格式:
异常处理后,不需要再写finally了,系统会自动释放资源,可以看到代码变简洁很多:
2
3
4
5
6
7
8
9
10
11
12
13
14
15
16
17
18
19
20
21
22
23
24
25
// 定义文件路径
String filePath = "example.txt";
// 使用 BufferedWriter 写文件
// 使用JDK7的异常处理形式,就不需要finally里关闭流对象了,出异常后系统会自动关闭
try (BufferedWriter bw = new BufferedWriter(new FileWriter(filePath))) {
bw.write("你好");
bw.newLine();
bw.write("世界");
bw.newLine();
bw.write("宇宙");
} catch (IOException e) {
// 实际场景建议用logger.error(),而不是e.printStackTrace()
e.printStackTrace();
}
// 使用 BufferedReader 读文件
try (BufferedReader br = new BufferedReader(new FileReader(filePath))) {
String line;
while ((line = br.readLine()) != null) {
System.out.println(line);
}
} catch (IOException e) {
e.printStackTrace();
}
}
特殊操作流
标准输入输出流:System.in和System.out
什么是标准输入输出流?
- 标准输出流:System.out。用于指定输出到控制台的数据。
- 标准输入流:System.in。用于读取用户在控制台输入的数据。
标准输出流
基本介绍
标准输出流:System.out。用于往控制台输出数据。
常用方法:
- print(): 打印数据到控制台,不换行。
- println(): 打印数据到控制台,并换行。
- printf(): 使用指定的格式字符串和参数将数据格式化并打印到控制台。
代码示例:
1 | public class Test { |
常用格式化符号
使用System.out、String.format可以对字符串格式化。
常用格式化符号
%d:十进制整数
%f:十进制浮点数
%e:科学计数法表示的十进制数
%g:根据值的大小,自动选择使用普通计数法或科学计数法
%s:字符串
%c:字符
%b:布尔值(true 或 false)
%x:整数的十六进制表示
%o:整数的八进制表示
%t 或 %T:日期和时间(需要与日期时间转换符配合使用)
%%:文字百分号(% 本身)
日期和时间转换符
%tF:年-月-日(yyyy-MM-dd)
%tD:月/日/年(MM/dd/yy)
%tT:时:分:秒(HH:mm:ss)
%tR:时:分(HH:mm)
%tY:年(四位数)
%ty:年(两位数)
%tm:月(两位数)
%td:日(两位数)
%tH:小时(24 小时制,两位数)
%tI:小时(12 小时制,两位数)
%tM:分钟(两位数)
%tS:秒(两位数)
%tp:小写上午或下午标记(am 或 pm)
%tZ:时区
代码示例:
1 | public class Test { |
标准输入流
基本介绍
标准输入流:System.in。用于读取用户在控制台输入的数据。
用法:
- 字符输入流:作为构造参数传入字符输入流InputStreamReader中,例如new InputStreamReader(System.in)。
- Scanner:因为用字符输入流包装太麻烦,所以Java提供了一个工具类实现键盘录入,即Scanner类,专门用于从各种输入源(如控制台、文件、字符串等)读取输入。
常用方法:
- read(): 从输入流中读取一个字节。
- read(byte[] b): 从输入流中读取一定数量的字节,并将其存储在缓冲区数组 b 中。
- read(byte[] b, int off, int len): 从输入流中将 len 个字节的数据读入一个字节数组。
代码示例:
1 | public static void main(String[] args) { |
Scanner类
因为用字符输入流包装太麻烦,所以Java提供了一个工具类实现键盘录入,即Scanner类,专门用于从各种输入源(如控制台、文件、字符串等)读取输入。
构造方法:
- Scanner(InputStream source): 构造一个新的 Scanner,生成的扫描器从指定的输入流读取数据。用于读取用户在控制台输入的数据。一般用System.in,即标准输入流,用于读取用户在控制台输入的数据。
- Scanner(File source): 构造一个新的 Scanner,生成的扫描器从指定的文件读取数据。
- Scanner(String source): 构造一个新的 Scanner,生成的扫描器从指定的字符串读取数据。
常用方法:
- nextInt()、nextDouble()、next():获取输入的整数、浮点数、字符串(不包括空格)等。
- nextLine():获取一行输入(包括空格)。
- hasNextInt()、hasNextDouble()、hasNext(): 判断下一个输入是否为整数、浮点数、字符串。
- useDelimiter(String pattern): 设置分隔符模式,用于指定不同类型数据之间的分隔符,默认为空白字符。
- close():关闭扫描器。
示例:
从控制台输入整数、浮点数、字符串,并在控制台打印。
2
3
4
5
6
7
8
9
10
11
12
13
14
15
16
17
18
19
20
public static void main(String[] args) {
// 创建 Scanner 对象,关联 System.in(标准输入流)
Scanner scanner = new Scanner(System.in);
// 从控制台读取整数
System.out.print("Enter an integer: ");
int intValue = scanner.nextInt();
System.out.println("You entered: " + intValue);
// 从控制台读取浮点数
System.out.print("Enter a double: ");
double doubleValue = scanner.nextDouble();
System.out.println("You entered: " + doubleValue);
// 从控制台读取字符串
System.out.print("Enter a string: ");
String stringValue = scanner.next();
System.out.println("You entered: " + stringValue);
// 关闭 Scanner 对象
scanner.close();
}
}
打印流
字节打印流:PrintStream
PrintStream用于将不同的数据类型格式化为字节并写入到输出流,支持自动刷新。它只负责输出数据,不负责读取数据。
一般情况下,打印数据用System.out.printf()就可以了,PrintStream适用于需要重定向输出的场景,例如将打印的结果写入一个文件中。
重定向输出:将输出重定向到文件、网络流或其他输出目标。
2
3
4
5
6
7
8
9
try (PrintStream ps = new PrintStream(new FileOutputStream("output.txt"))) {
ps.println("Hello, World!");
ps.println(123);
ps.println(true);
} catch (IOException e) {
e.printStackTrace();
}
}
构造方法:
- PrintStream(OutputStream out): 创建一个新的打印流,使用指定的输出流。
- PrintStream(OutputStream out, boolean autoFlush): 创建一个新的打印流,使用指定的输出流和自动刷新设置。
- PrintStream(OutputStream out, boolean autoFlush, String encoding): 创建一个新的打印流,使用指定的输出流、自动刷新设置和字符编码。
- PrintStream(String fileName): 创建一个新的打印流,使用指定的文件名。
- PrintStream(String fileName, String encoding): 创建一个新的打印流,使用指定的文件名和字符编码。
- PrintStream(File file): 创建一个新的打印流,使用指定的文件。
- PrintStream(File file, String encoding): 创建一个新的打印流,使用指定的文件和字符编码。
常用方法:
- void print(String s): 打印字符串。
- PrintStream printf(String format, Object… args): 使用指定的格式字符串和参数,将格式化的字符串输出到该流。
- void println(int i): 打印整数并换行。
- close():关闭。
代码示例:
1 | // 打印到控制台: |
字符打印流:PrintWriter
PrintWriter与 PrintStream 类似,都用于打印数据到文件。主要区别是PrintWriter用于打印字符流,而不是字节流,它可以自动处理字符编码。
构造方法:
PrintWriter(OutputStream out): 创建一个新的 PrintWriter,从现有的 OutputStream 输出字符。
PrintWriter(OutputStream out, boolean autoFlush): 创建一个新的 PrintWriter,从现有的 OutputStream 输出字符,并指定是否在调用 println、printf 或 format 方法时自动刷新。
PrintWriter(Writer out): 创建一个新的 PrintWriter,从现有的 Writer 输出字符。
PrintWriter(Writer out, boolean autoFlush): 创建一个新的 PrintWriter,从现有的 Writer 输出字符,并指定是否在调用 println、printf 或 format 方法时自动刷新。
PrintWriter(String fileName): 创建一个新的 PrintWriter,将输出写入指定的文件。
PrintWriter(String fileName, String csn): 创建一个新的 PrintWriter,将输出写入指定的文件,使用给定的字符集。
PrintWriter(File file): 创建一个新的 PrintWriter,将输出写入指定的文件。
PrintWriter(File file, String csn): 创建一个新的 PrintWriter,将输出写入指定的文件,使用给定的字符集。
常用方法:
- 跟PrintStream基本一致,这里不再赘述。
代码示例:
1 | public static void main(String[] args) throws IOException { |
序列号流和反序列化流
Serializable 接口和serialVersionUID变量
序列化和反序列化:
- 序列化:将对象转换为字节流。转为字节流后可以把它写入文件、数据库,或者传输到网络中。
- 反序列化:序列化的逆过程,也就是将字节流转换回对象。
不参与序列化的字段:被transient修饰的成员变量不参与序列化。
被序列化的类必须实现Serializable接口,并且声明一个成员变量serialVersionUID。
Serializable 接口:
用于标记一个类的对象可被序列化。该接口没有任何方法,它仅仅是一个标记,表明实现这个接口的类可以被 Java 的序列化机制处理。
若一个类的对象没有实现这个接口,并且他的对象被序列号,则会报错不能序列号异常java.io.NotSerializableException
erialVersionUID变量:
- 作用:serialVersionUID是类的版本号,类型是长整型数值,该字段的主要作用是检查反序列化时类的版本,与序列化时类的版本是否一致。
- 私有:为了保证不同Java编译器实现之间的一致的serialVersionUID值,一个可序列化的类必须声明一个显式的serialVersionUID值,尽量使用private修饰符。
- 序列化类必须包含serialVersionUID:为了保证不同Java编译器实现之间的一致的serialVersionUID值,一个可序列化的类必须声明一个显式的serialVersionUID值,尽量使用private修饰符。
- 建议手动指定:如果实现了Serializable接口,并且没有指定serialVersionUID,编译器会隐式地自动生成一个serialVersionUID,但是建议手动指定,因为默认的serialVersionUID计算对类详细信息非常敏感,从而出现InvalidClassException。
InvalidClassException异常:
序列化时版本号不匹配,会抛出无效类异常。例如反序列化时类的版本号,与序列化时类的版本号不一致在序列化之后,类的结构发生了变化,例如添加、删除或修改了字段,导致版本号不匹配。
代码示例:
1 | // 创建一个可序列号的Dog类 |
对象序列化流:ObjectOutputStream
序列化流可以将对象转换为字节流,并保存到文件或者传输到网络。
构造方法:
- ObjectOutputStream(OutputStream out): 创建一个写入指定 OutputStream 的 ObjectOutputStream。构造参数是FileOutputStream等OutputStream的子类。
常用方法:
- void writeObject(Object obj): 将指定的对象写入 ObjectOutputStream。
- void close(): 关闭输出流并释放与此流相关联的所有系统资源。
- void flush(): 刷新输出流,并强制任何缓冲的输出字节被写出。
代码示例:被序列化的类使用上一节创建的Dog类:
1 | public class Test { |
对象反序列化流:ObjectInputStream
ObjectInputStream是序列化的逆过程,也就是将字节流转换回对象。
构造方法
- ObjectOutputStream(OutputStream out): 创建一个写入指定 OutputStream 的 ObjectOutputStream。
常用方法
- void writeObject(Object obj): 将指定的对象写入 ObjectOutputStream。
- void close(): 关闭输出流并释放与此流相关联的所有系统资源。
- void flush(): 刷新输出流,并强制任何缓冲的输出字节被写出。
代码示例:反序列化上一节创建的dog.txt:
1 | public class Test { |